How to Make an Instagram Carousel from a Blog Post
Learn how to turn any blog post into a polished Instagram carousel, step by step, with tools, tips, and size specs. Start repurposing your content today.

On this page
Turning a blog post into an Instagram carousel is a content repurposing workflow, not a design project. The core process: identify 5-10 key points from the post, reframe each as a single swipeable slide, write a hook for slide one, add a CTA on the final slide, and export at 1080x1080px (square) or 1080x1350px (portrait). Each slide should carry one idea, not a paragraph. The hook slide determines whether anyone swipes, so treat it like a headline: specific, curiosity-driven, and immediately relevant to your audience. Body slides work best with a short headline plus two or three supporting lines, not wall-to-wall text. The final slide closes with a clear next step: follow, save, comment, or click the link in bio. Design consistency across all slides reinforces brand recognition and signals quality to the Instagram algorithm. Tools range from manual design platforms like Canva to AI-generation tools like Canvora, which converts a blog URL directly into a formatted carousel without any template work.
TL;DR
- Extract 5-10 discrete ideas from the blog post; each becomes one carousel slide
- Slide one is the hook: treat it like an ad headline, not a chapter title
- Use 1080x1080px (square) or 1080x1350px (portrait) for all slides
- Aim for 5-8 slides; Instagram allows up to 20, but attention spans reward tight, focused carousels
- Keep each slide to one idea with a short headline and minimal supporting text
- End every carousel with a CTA slide that tells the reader exactly what to do next
- AI generation tools like Canvora can take a blog URL as input and produce a formatted, brand-consistent Instagram carousel in about a minute, skipping the template-browsing step entirely
- Carousels consistently outperform single-image posts on engagement rate, making them one of the highest-ROI formats for repurposing long-form content
What Is an Instagram Carousel Post (and Why Repurpose Blog Content Into One)?
An Instagram carousel post is a single swipeable post containing between 2 and 20 slides, each slide a static image (or video), all sharing one caption and one set of engagement metrics. Carousels consistently outperform single-image posts on reach and saves: Instagram's algorithm re-serves a carousel to users who didn't swipe through on first exposure, effectively giving the post a second impression without any extra promotion spend. Blog posts are structurally well-suited to this format. A well-written article already contains a clear argument, supporting points, and a conclusion. That structure maps directly onto a slide sequence: hook slide, key point per slide, CTA at the end. Converting that existing structure into a carousel is not a creative stretch. It is content atomization, moving one piece of long-form thinking into a format built for scrollers. Instagram allows up to 20 slides per carousel post, though 5-8 is usually enough to cover the core argument of most 800-1,500 word articles without padding.
The repurposing case goes beyond convenience. Blog readers and Instagram followers are rarely the same audience. A post that already performed well on your site can reach an entirely different set of people through a carousel, with no new research and no new argument to construct. The only work is reformatting. That is a favorable ratio of effort to reach. For content marketers managing a weekly publishing calendar, turning one blog post into a carousel, a LinkedIn swipe post, and a set of quote cards is a standard content atomization move. It stretches a single piece of thinking across multiple platforms and multiple audience segments without diluting the original.
What You Need Before You Start
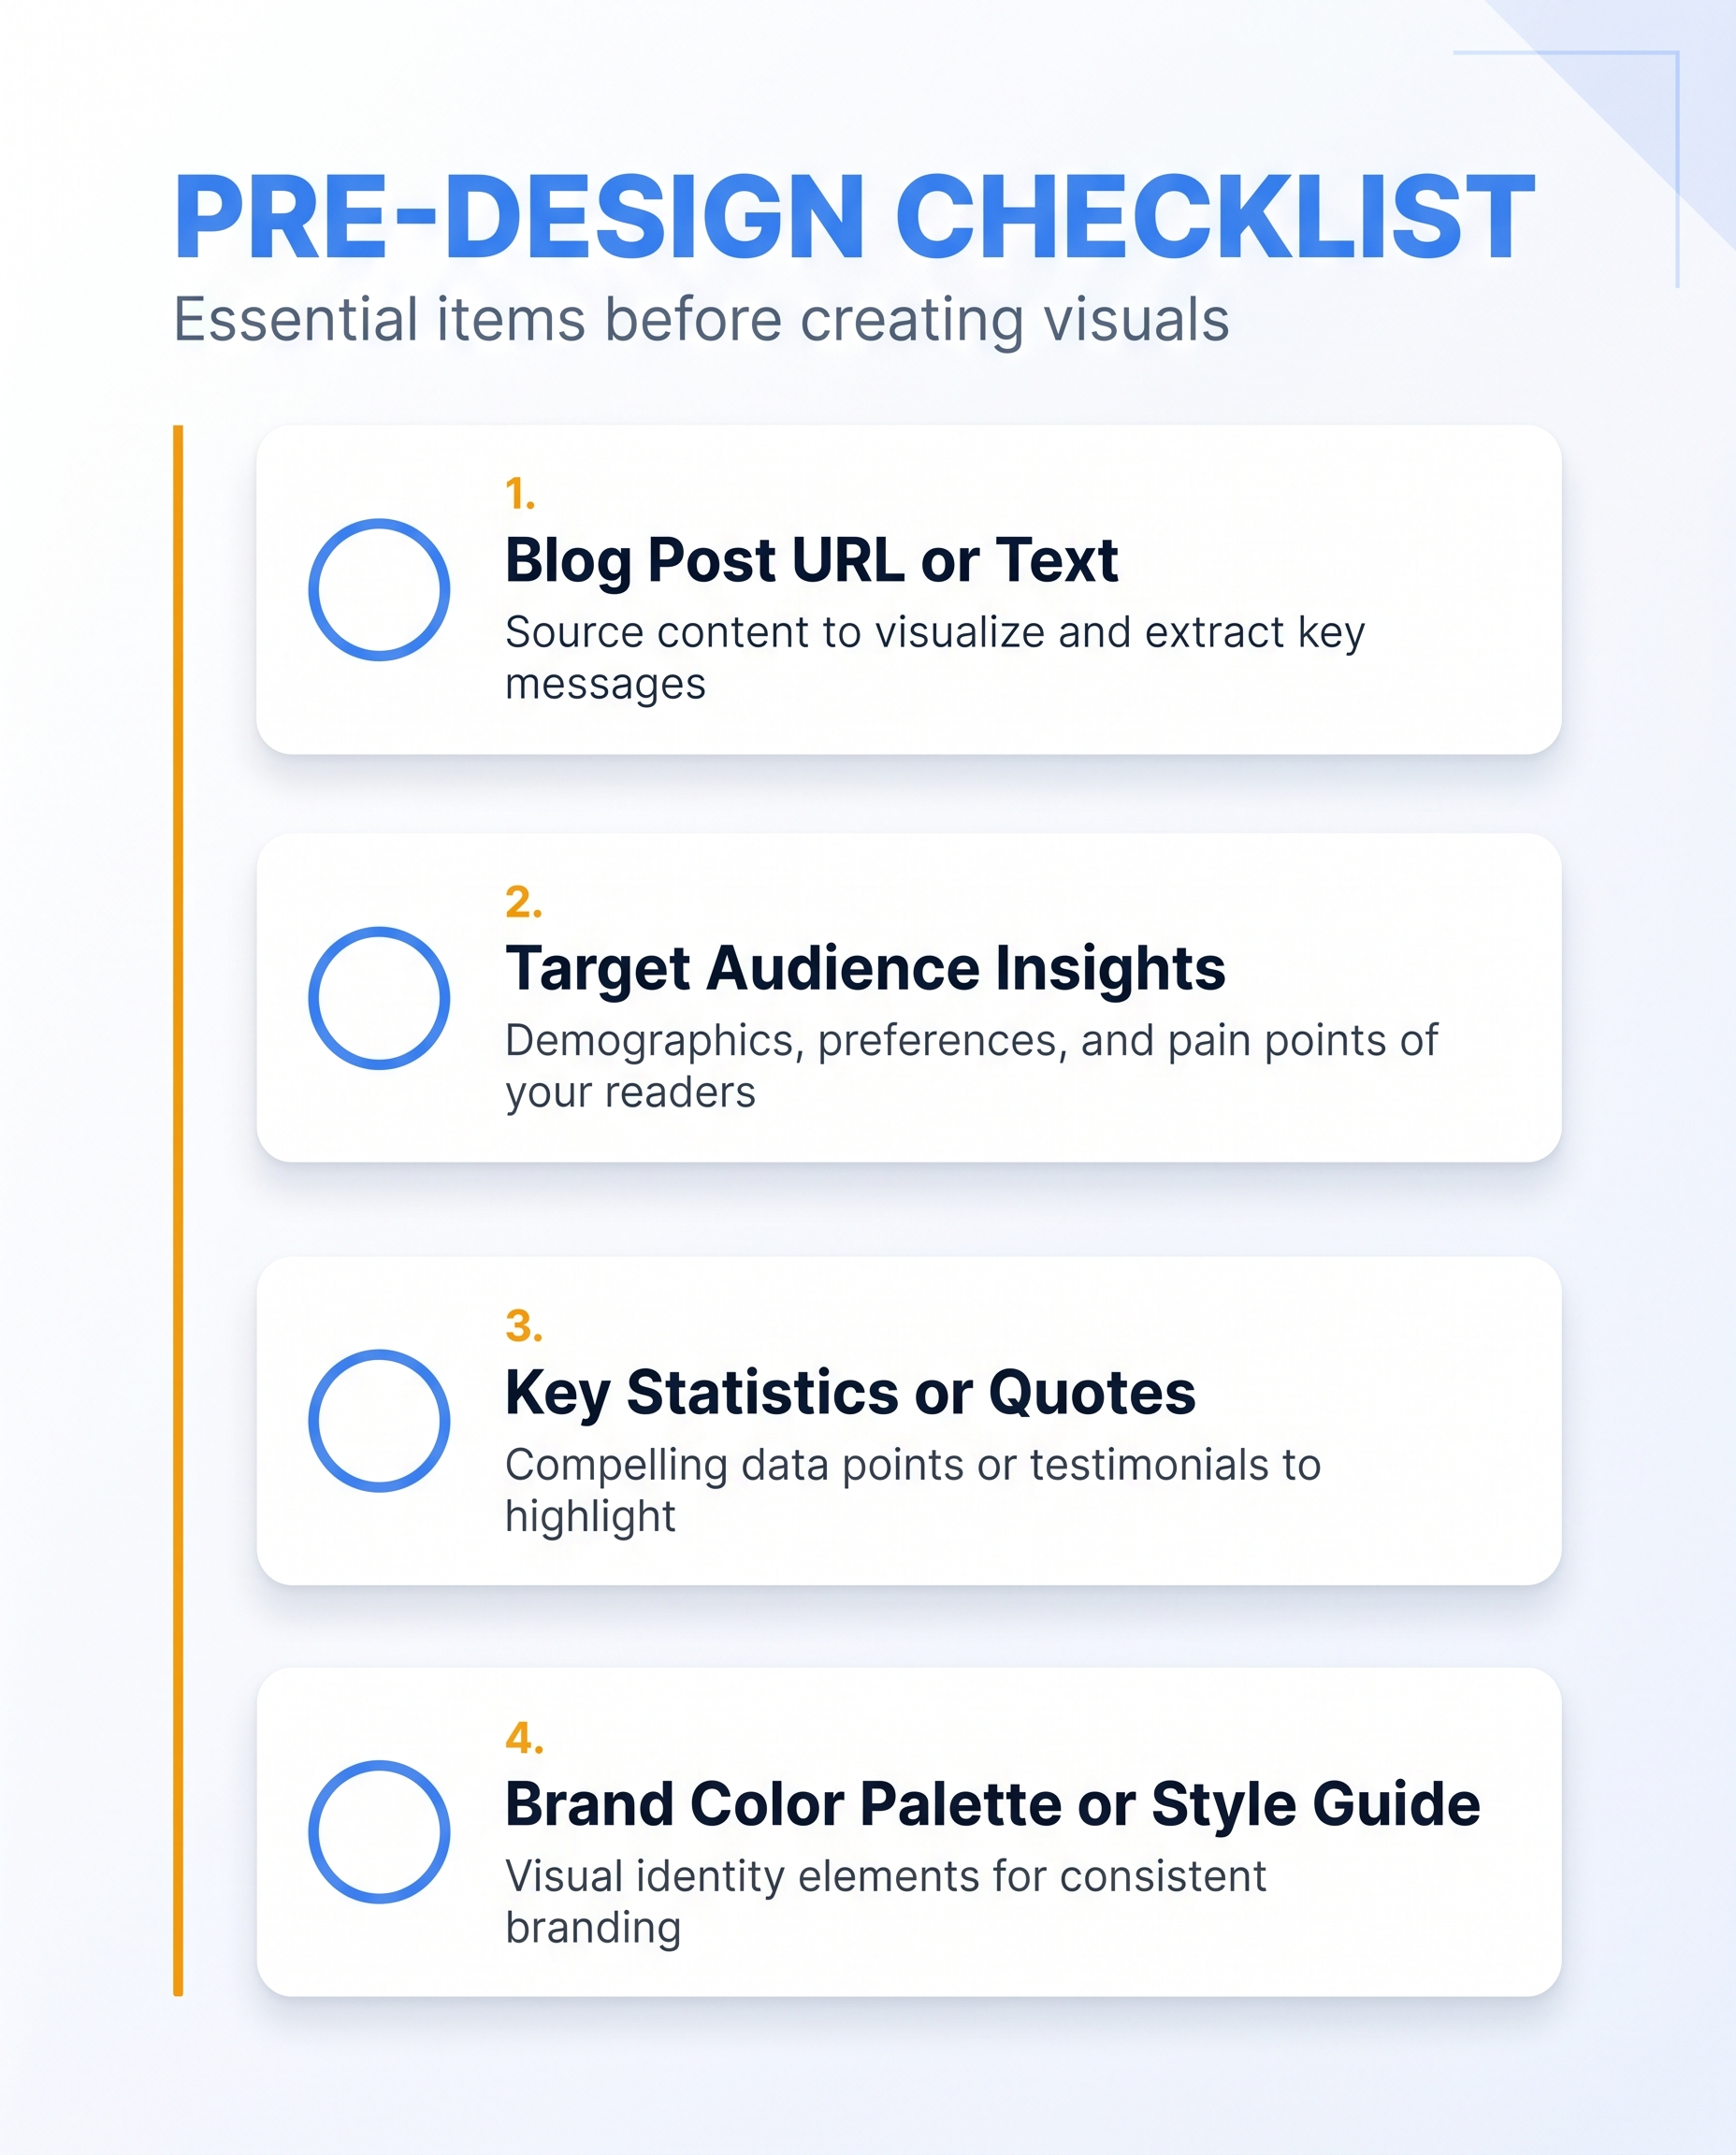 Gather these materials before designing your first slide.
Before touching any tool, gather the raw materials. A smooth carousel workflow starts with decisions made before the first slide is designed.
Your content source. Pull up the blog post URL or paste the full text into a document. Read it with one question in mind: what is the single most useful thing a reader takes away? That answer becomes your carousel's spine. Every slide should either build toward it or unpack it. If the post covers five separate topics, pick one and save the others for future carousels. Trying to compress an entire 2,000-word post into 10 slides without a clear throughline produces noise, not content.
Your hook. Slide 1 is the only slide most people see before deciding whether to swipe. Write the hook before you open any design tool. It should name a problem, a counterintuitive claim, or a specific result. "3 things to know about SEO" is not a hook. "Your bounce rate is high because of this one page element" is closer.
Brand assets. Collect your logo file, hex color codes, and font names. If your tool supports brand kits, upload them once and stop thinking about it. If it doesn't, keep a reference doc open so you're not guessing your brand blue mid-session.
Aspect ratio. Instagram supports both 1:1 (square) and 4:5 (portrait). Portrait fills more of the feed and tends to perform better on mobile, but square is safer if the same carousel will be cross-posted to Facebook or Threads. Decide before you design, not after.
Supplemental visuals. If the blog post includes charts, screenshots, or product images you want to carry into the carousel, download them now.
Your caption draft. The carousel's opening line in the caption is separate from slide 1 but equally important. Draft it now, even roughly. It should echo the hook without repeating it word for word.
How to Turn a Blog Post Into an Instagram Carousel Using Canvora
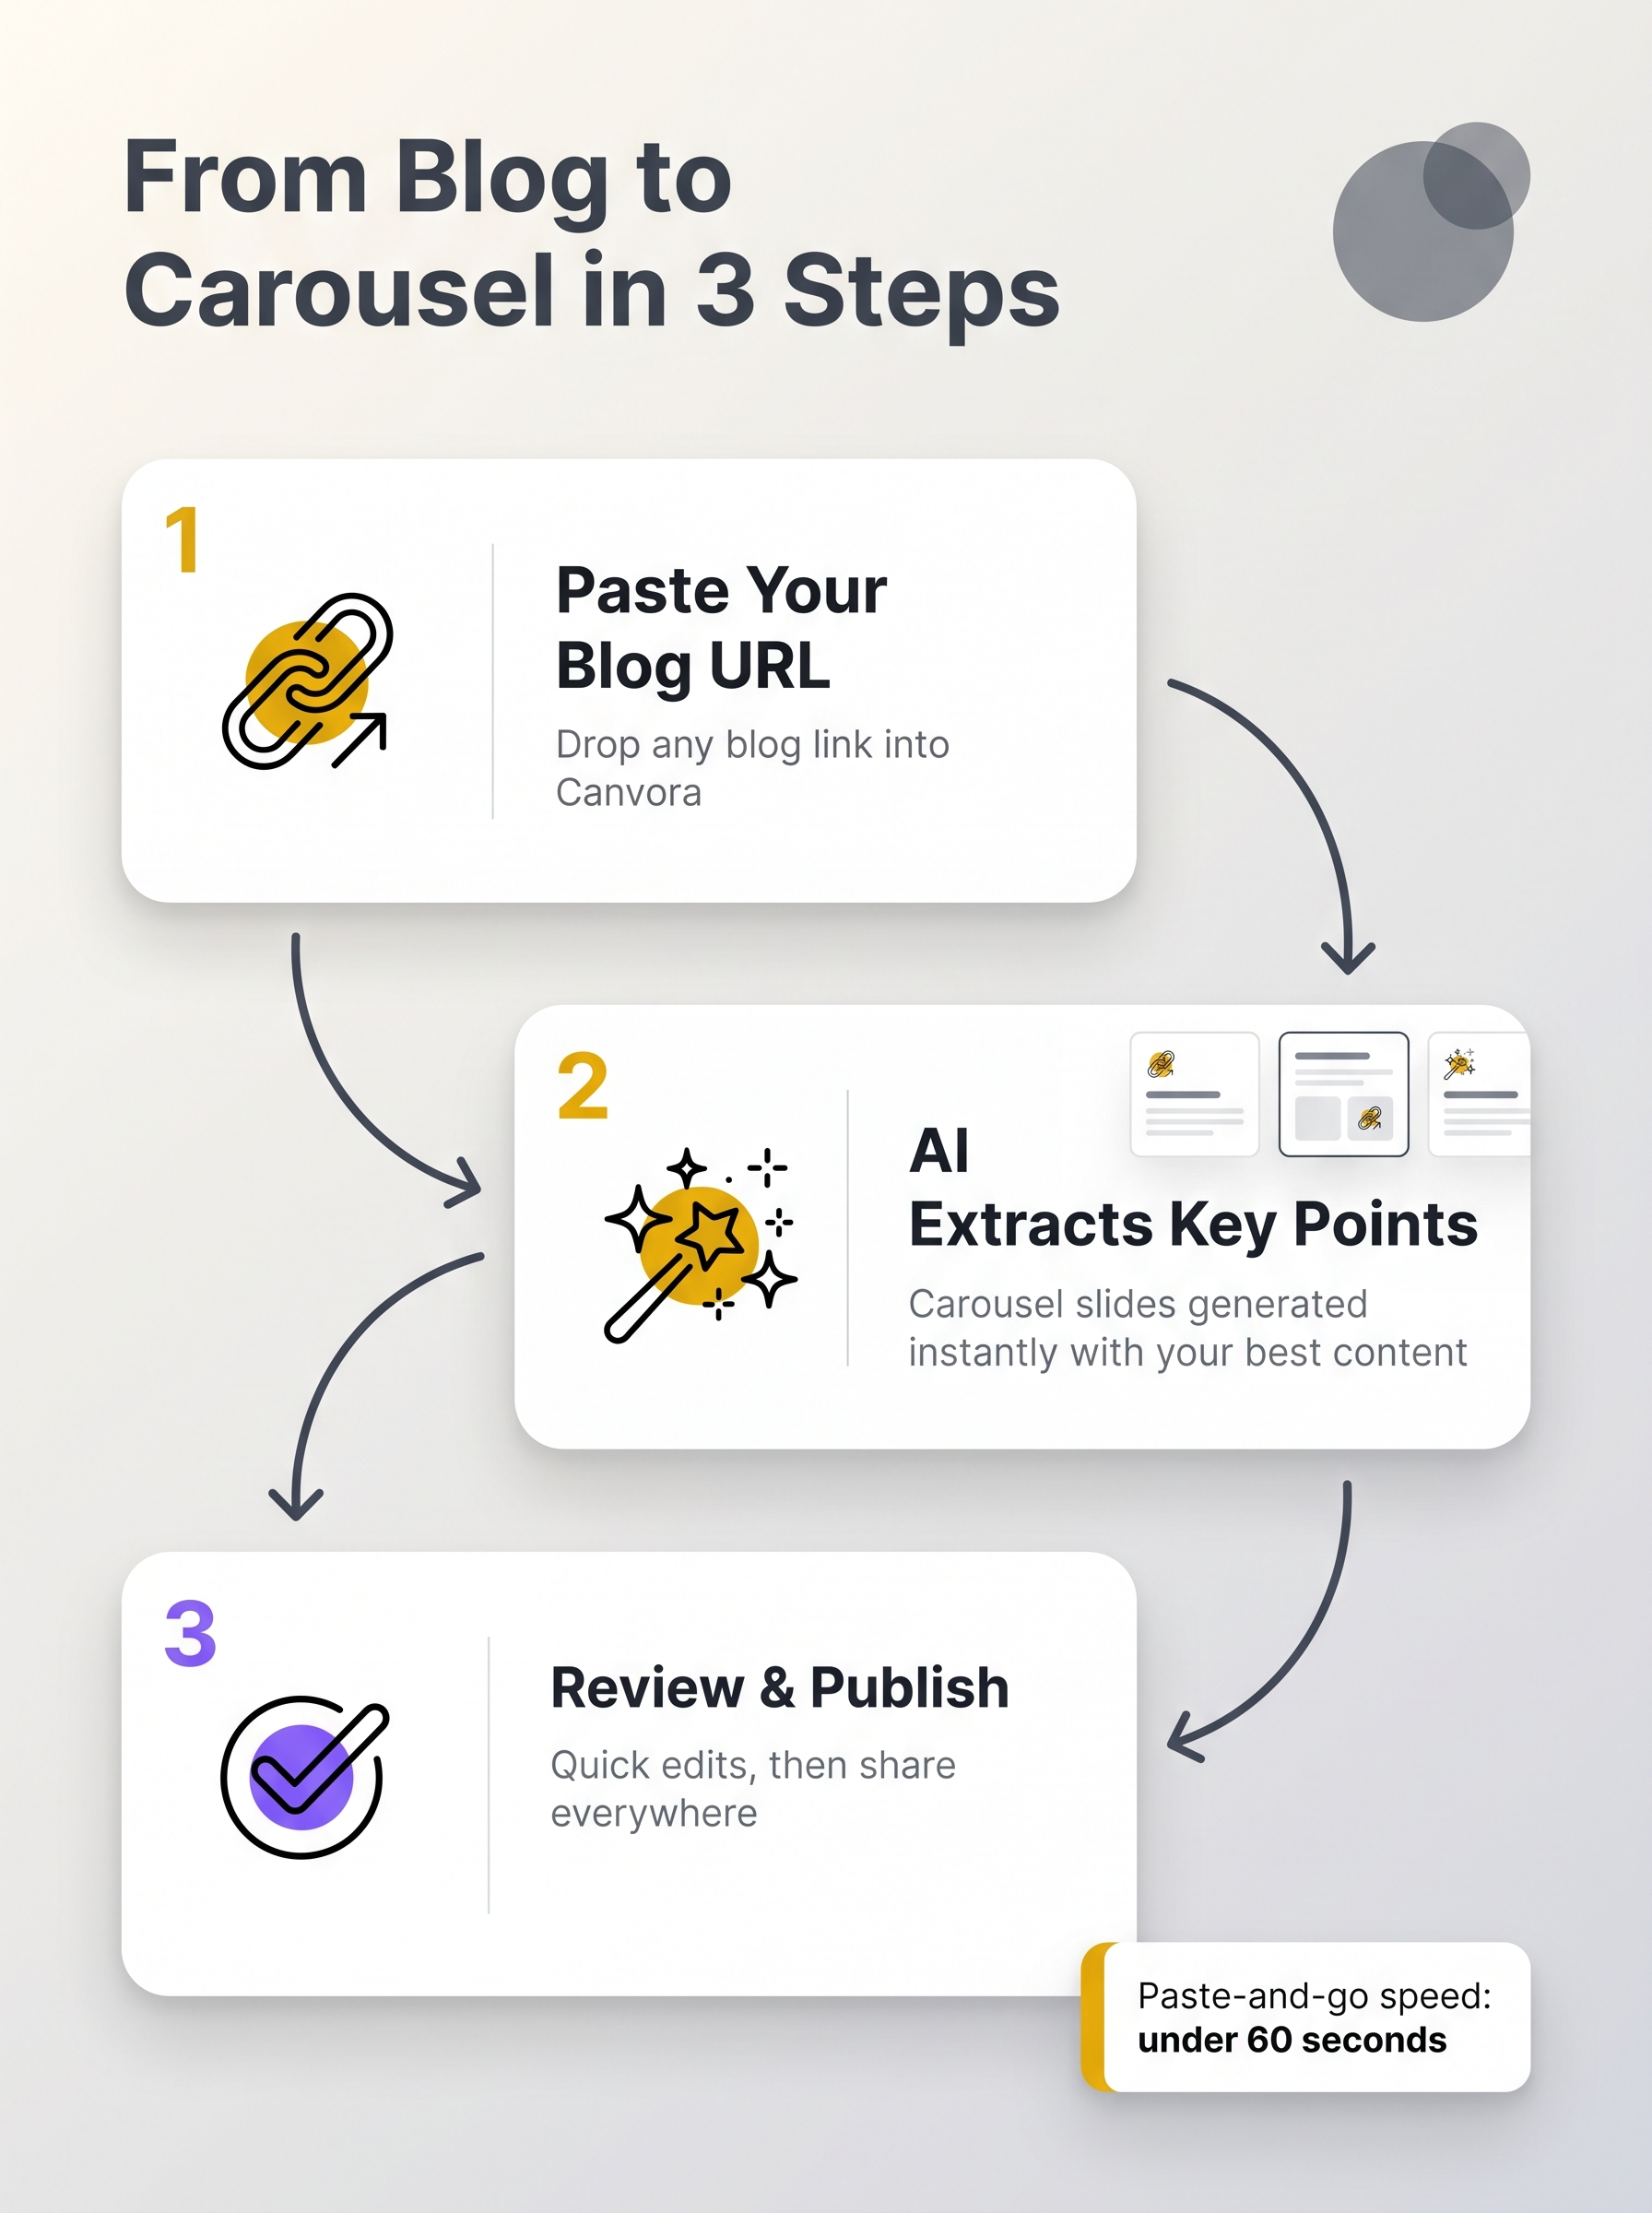 Canvora automates the extraction and slide layout in three steps.
Canvora turns a blog post into a finished Instagram carousel without requiring you to copy a single line of text. Paste the blog URL directly into Canvora, or upload the post as a PDF or Word document, and the platform reads the content automatically. From there, select Instagram carousel as your output format, choose how many slides you want (up to 15), and pick a visual style: modern, minimal, bold, elegant, playful, corporate, creative, or dark. If you have a brand kit configured, Canvora applies your logo, colors, and fonts to every slide before you see the first result. The carousel generates in about a minute. If your blog targets a non-English audience, Canvora generates the on-slide content in 150+ languages, so a Spanish-language version for LATAM or a Bahasa Indonesia version for SEA takes the same steps as an English one.
Once the slides appear, editing is straightforward. Type a natural-language instruction ("make the headline larger," "use a darker background on slide three") and Canvora applies the change. For precise text corrections, the Visual Editor lets you click directly into any headline or body copy and retype it. Neither path requires design knowledge.
When the carousel reads the way you want it, export as PNG or PDF. Starter plan and above unlock up to 4K resolution, which keeps slides sharp on high-density screens. PNG works for direct upload to Instagram; PDF is useful if you need to share a proof with a client or stakeholder before posting.
The whole workflow, from URL to export-ready slides, runs without opening a design tool or touching a template.
How to Make an Instagram Carousel from a Blog Post for Free
Making an Instagram carousel from a blog post without spending money is possible, but every free option involves a real trade-off. Canvora's free tier gives you a one-time 150-credit signup bonus (credits do not renew monthly). At 15 credits per slide, that covers a full carousel (around 10 slides) or a couple of shorter ones — enough to test the workflow end to end. The catch: outputs are watermarked, capped at 2K resolution, and the plan includes 1 brand kit, so you can carry your logo and colors. That makes the free tier genuinely useful for validating whether the format works for your content, but not for publishing to a live audience. Template-based tools like Canva and Adobe Express offer free plans with no watermarks, but the trade-off shifts to time: you still need to manually lay out each slide, resize assets, and write copy from scratch. Neither approach is truly free once you factor in the labor.
What "free" actually costs
| Option | Money | Time | Watermark | Brand kit |
|---|---|---|---|---|
| Canvora free tier | $0 | Low (AI generates) | Yes | 1 kit |
| Canva free | $0 | High (manual layout) | No | Limited |
| Manual design | $0 | Very high | No | Depends on tool |
The honest recommendation: use free tiers to test whether your blog content translates well into carousel format. Once you know it does, the Starter plan at $19/month removes watermarks, adds a brand kit, and gives you 1,000 credits monthly.
One underrated perk of the free tier: Canvora's MCP integration works on all plans, including Free. You can prompt it directly from Claude or ChatGPT at no extra cost, which makes the testing workflow faster than opening a separate app.
Step-by-Step: The Manual Route (No Dedicated Tool Required)
Converting a blog post into an Instagram carousel manually is entirely doable. It takes longer than an AI-assisted workflow, but understanding the process makes you a sharper editor of whatever tool you eventually use.
Step 1: Strip the post to its skeleton. Open the blog post and extract only the load-bearing content: the headline, three to five key points, and one clear call to action. Cut everything else. A 1,500-word post should reduce to roughly 80-100 words of raw material. If you can't summarize a section in one sentence, it probably doesn't belong on a slide.
Step 2: Map each point to a slide. Slide 1 is the hook. It should name the problem or promise the payoff, nothing more. Slides 2 through 8 each carry one idea. Slides 9 and 10 are the close: a brief summary and a CTA ("save this", "follow for more", "link in bio"). This structure keeps the carousel scannable and gives the Instagram algorithm something to reward, since swipe-through rate is a signal it weighs.
Step 3: Design at the right dimensions. Use 1080×1080px for a square format or 1080×1350px for portrait (4:5 ratio). Portrait takes up more feed real estate and tends to perform better on mobile. Any image editor works here.
Step 4: Keep text tight. Aim for 20-30 words per slide, maximum. If a slide needs more, split it into two.
Step 5: Export each slide separately. Save as JPEG or PNG. Name files sequentially (slide-01.png, slide-02.png) so upload order is obvious.
Step 6: Upload in order. Use the Instagram app or Creator Studio. Select all slides at once and confirm the sequence before posting.
Instagram Carousel Size Requirements and Specs
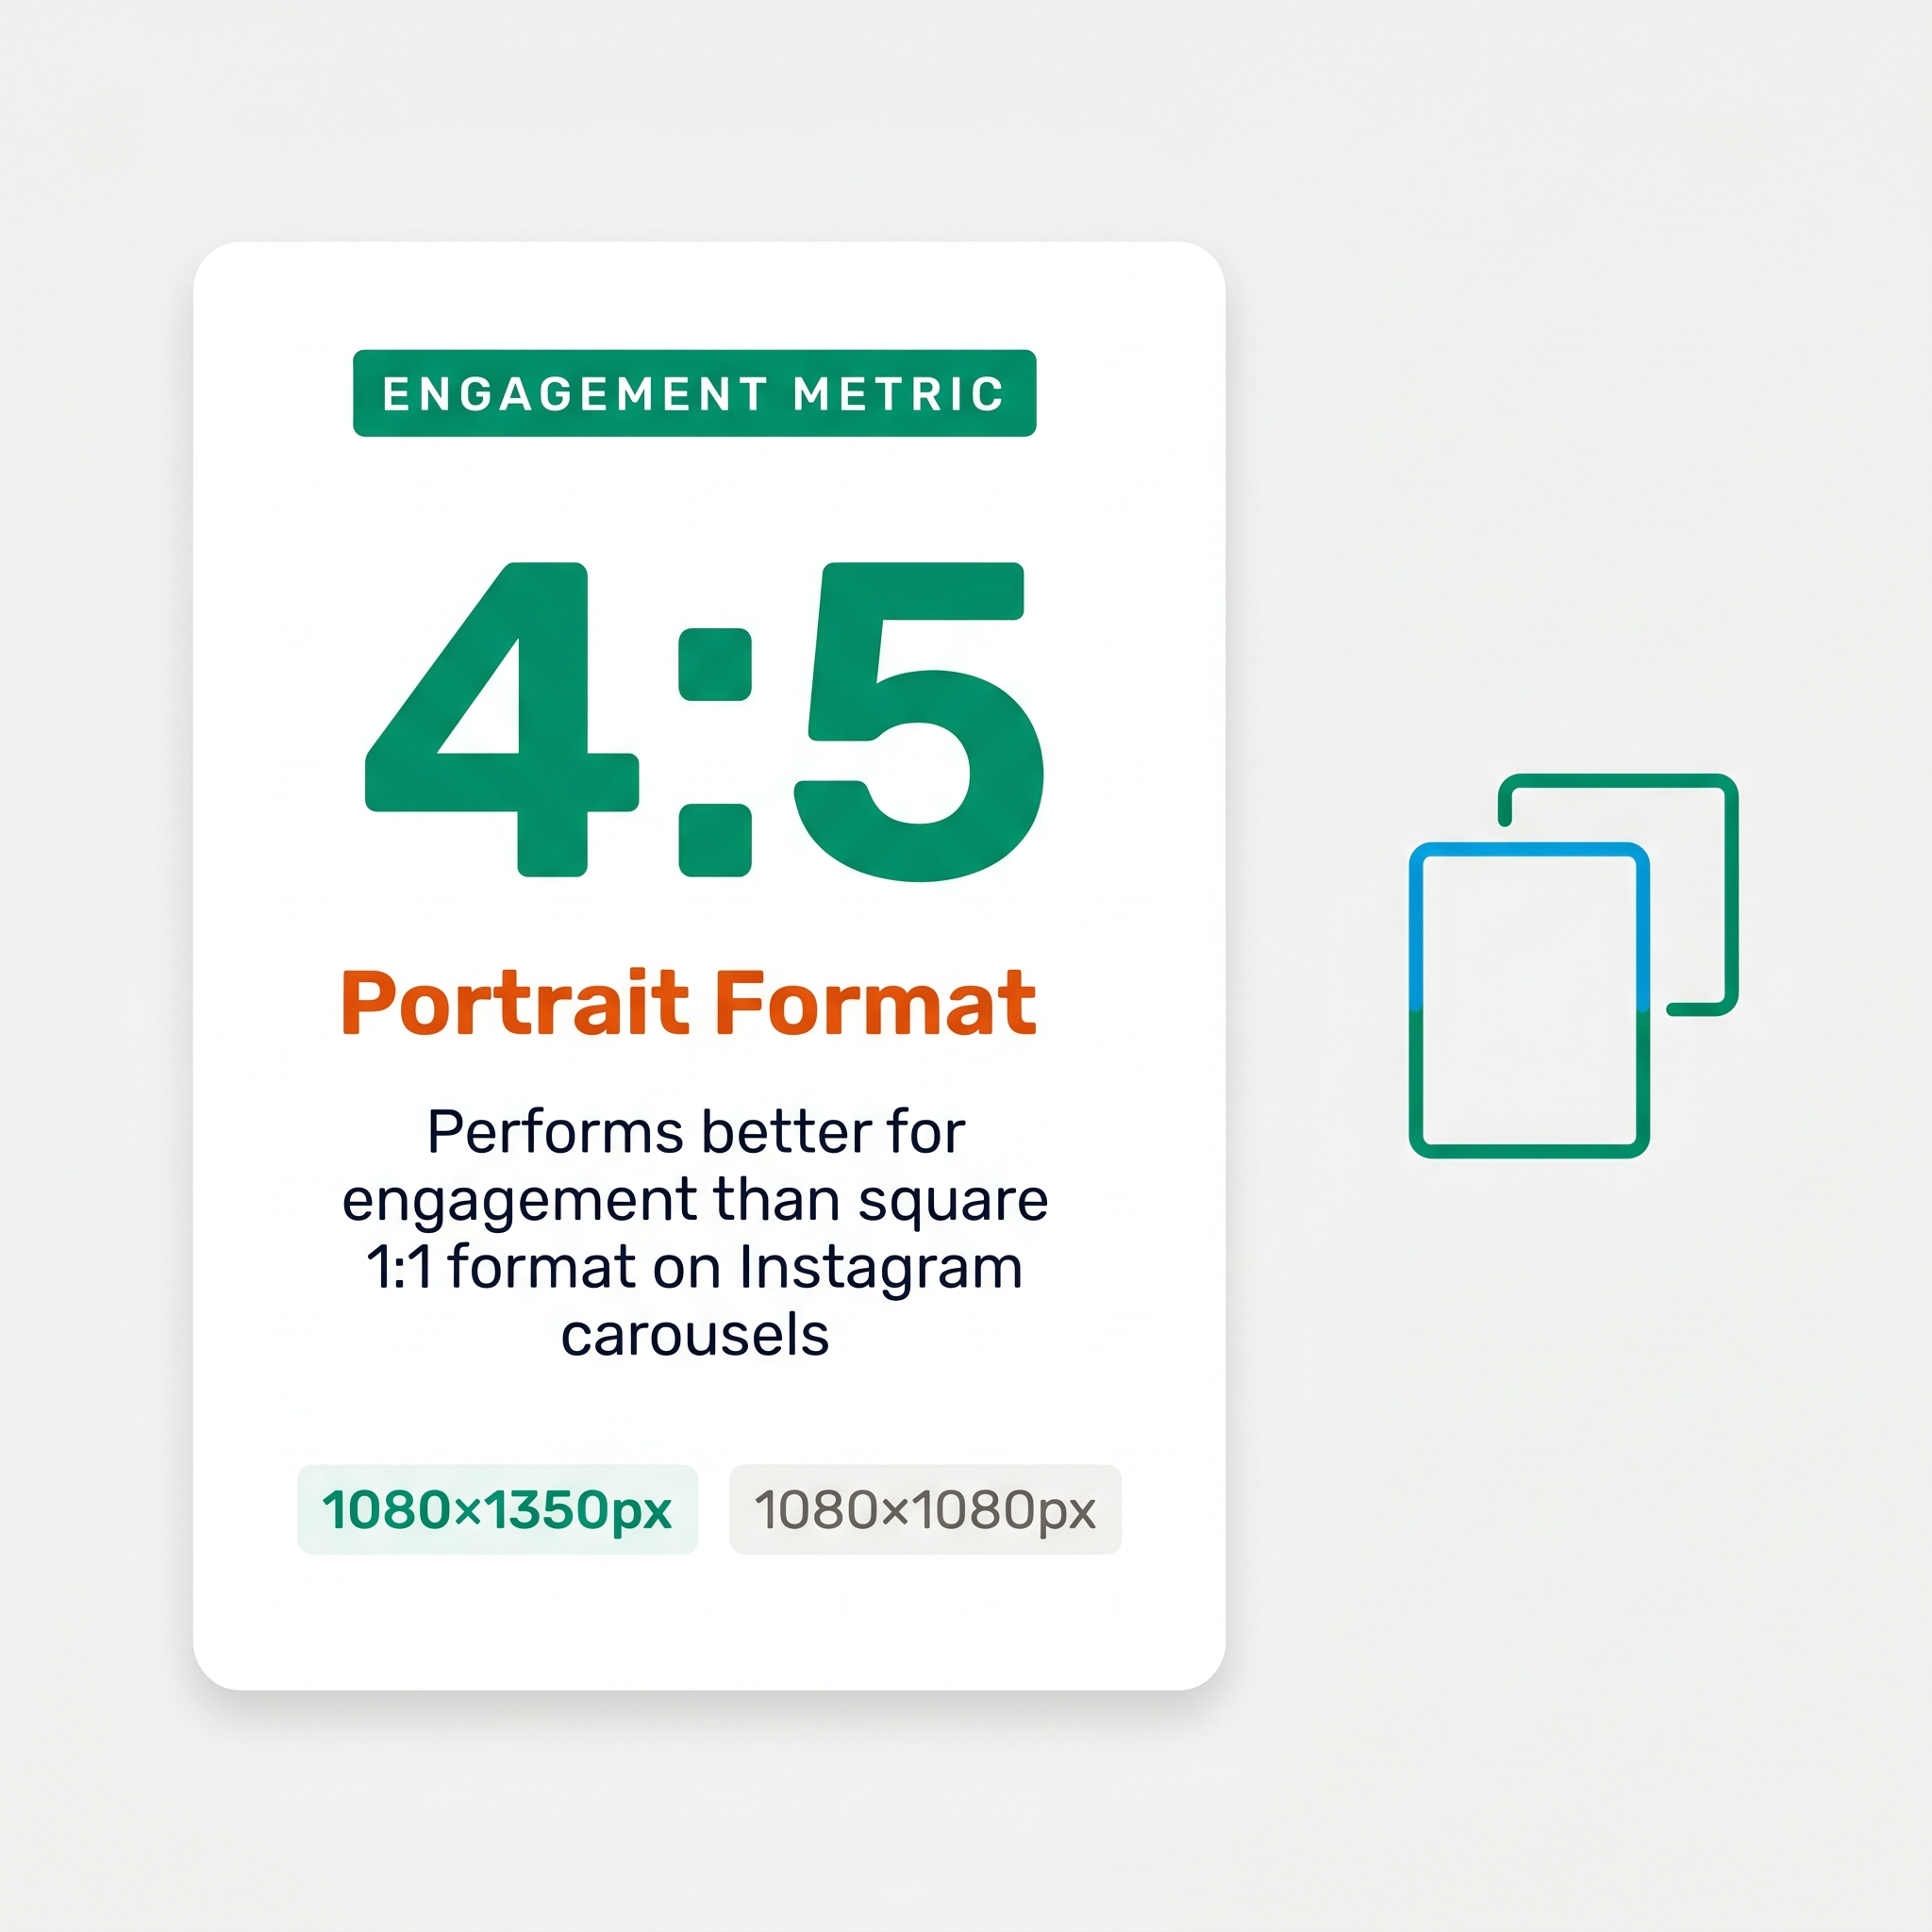 Portrait format (4:5) typically drives higher engagement on Instagram.
An Instagram carousel accepts between 2 and 20 slides per post. The recommended dimensions are 1080×1080px for a square (1:1) format or 1080×1350px for portrait (4:5), with portrait generally performing better on mobile because it takes up more screen real estate in the feed. Instagram accepts JPEG and PNG files for static slides, with a maximum file size of 30MB per slide and a minimum image width of 320px. That said, always design at 1080px or above, anything smaller will look soft on modern screens. The most important spec that most guides skip: keep all text, logos, and key visual elements at least 150px from every edge. Instagram crops previews differently across devices and feed placements, and anything too close to the border risks getting cut off entirely.
Once you have those specs locked in, the practical workflow becomes straightforward. Square (1:1) works well when you want consistency across Instagram, Facebook, and Threads in a single export pass. Portrait (4:5) is the stronger default for Instagram-only carousels because it dominates more of the screen before the viewer scrolls past.
A few things worth noting for blog-to-carousel conversions specifically:
- Slide count: Aim for 5-8 slides for most blog posts. Instagram allows up to 20, but more isn't better — tight beats long.
- Text density: Each slide should carry one idea. Dense paragraphs lifted directly from a blog post will not read well at carousel scale.
- Consistency: Font sizes, color palette, and logo placement should stay identical across all slides. Inconsistent styling signals a rushed post, and readers notice.
- Final slide: Always include a CTA slide. Without it, the carousel ends with no next step for the viewer.
How to Structure Your Carousel for Maximum Engagement
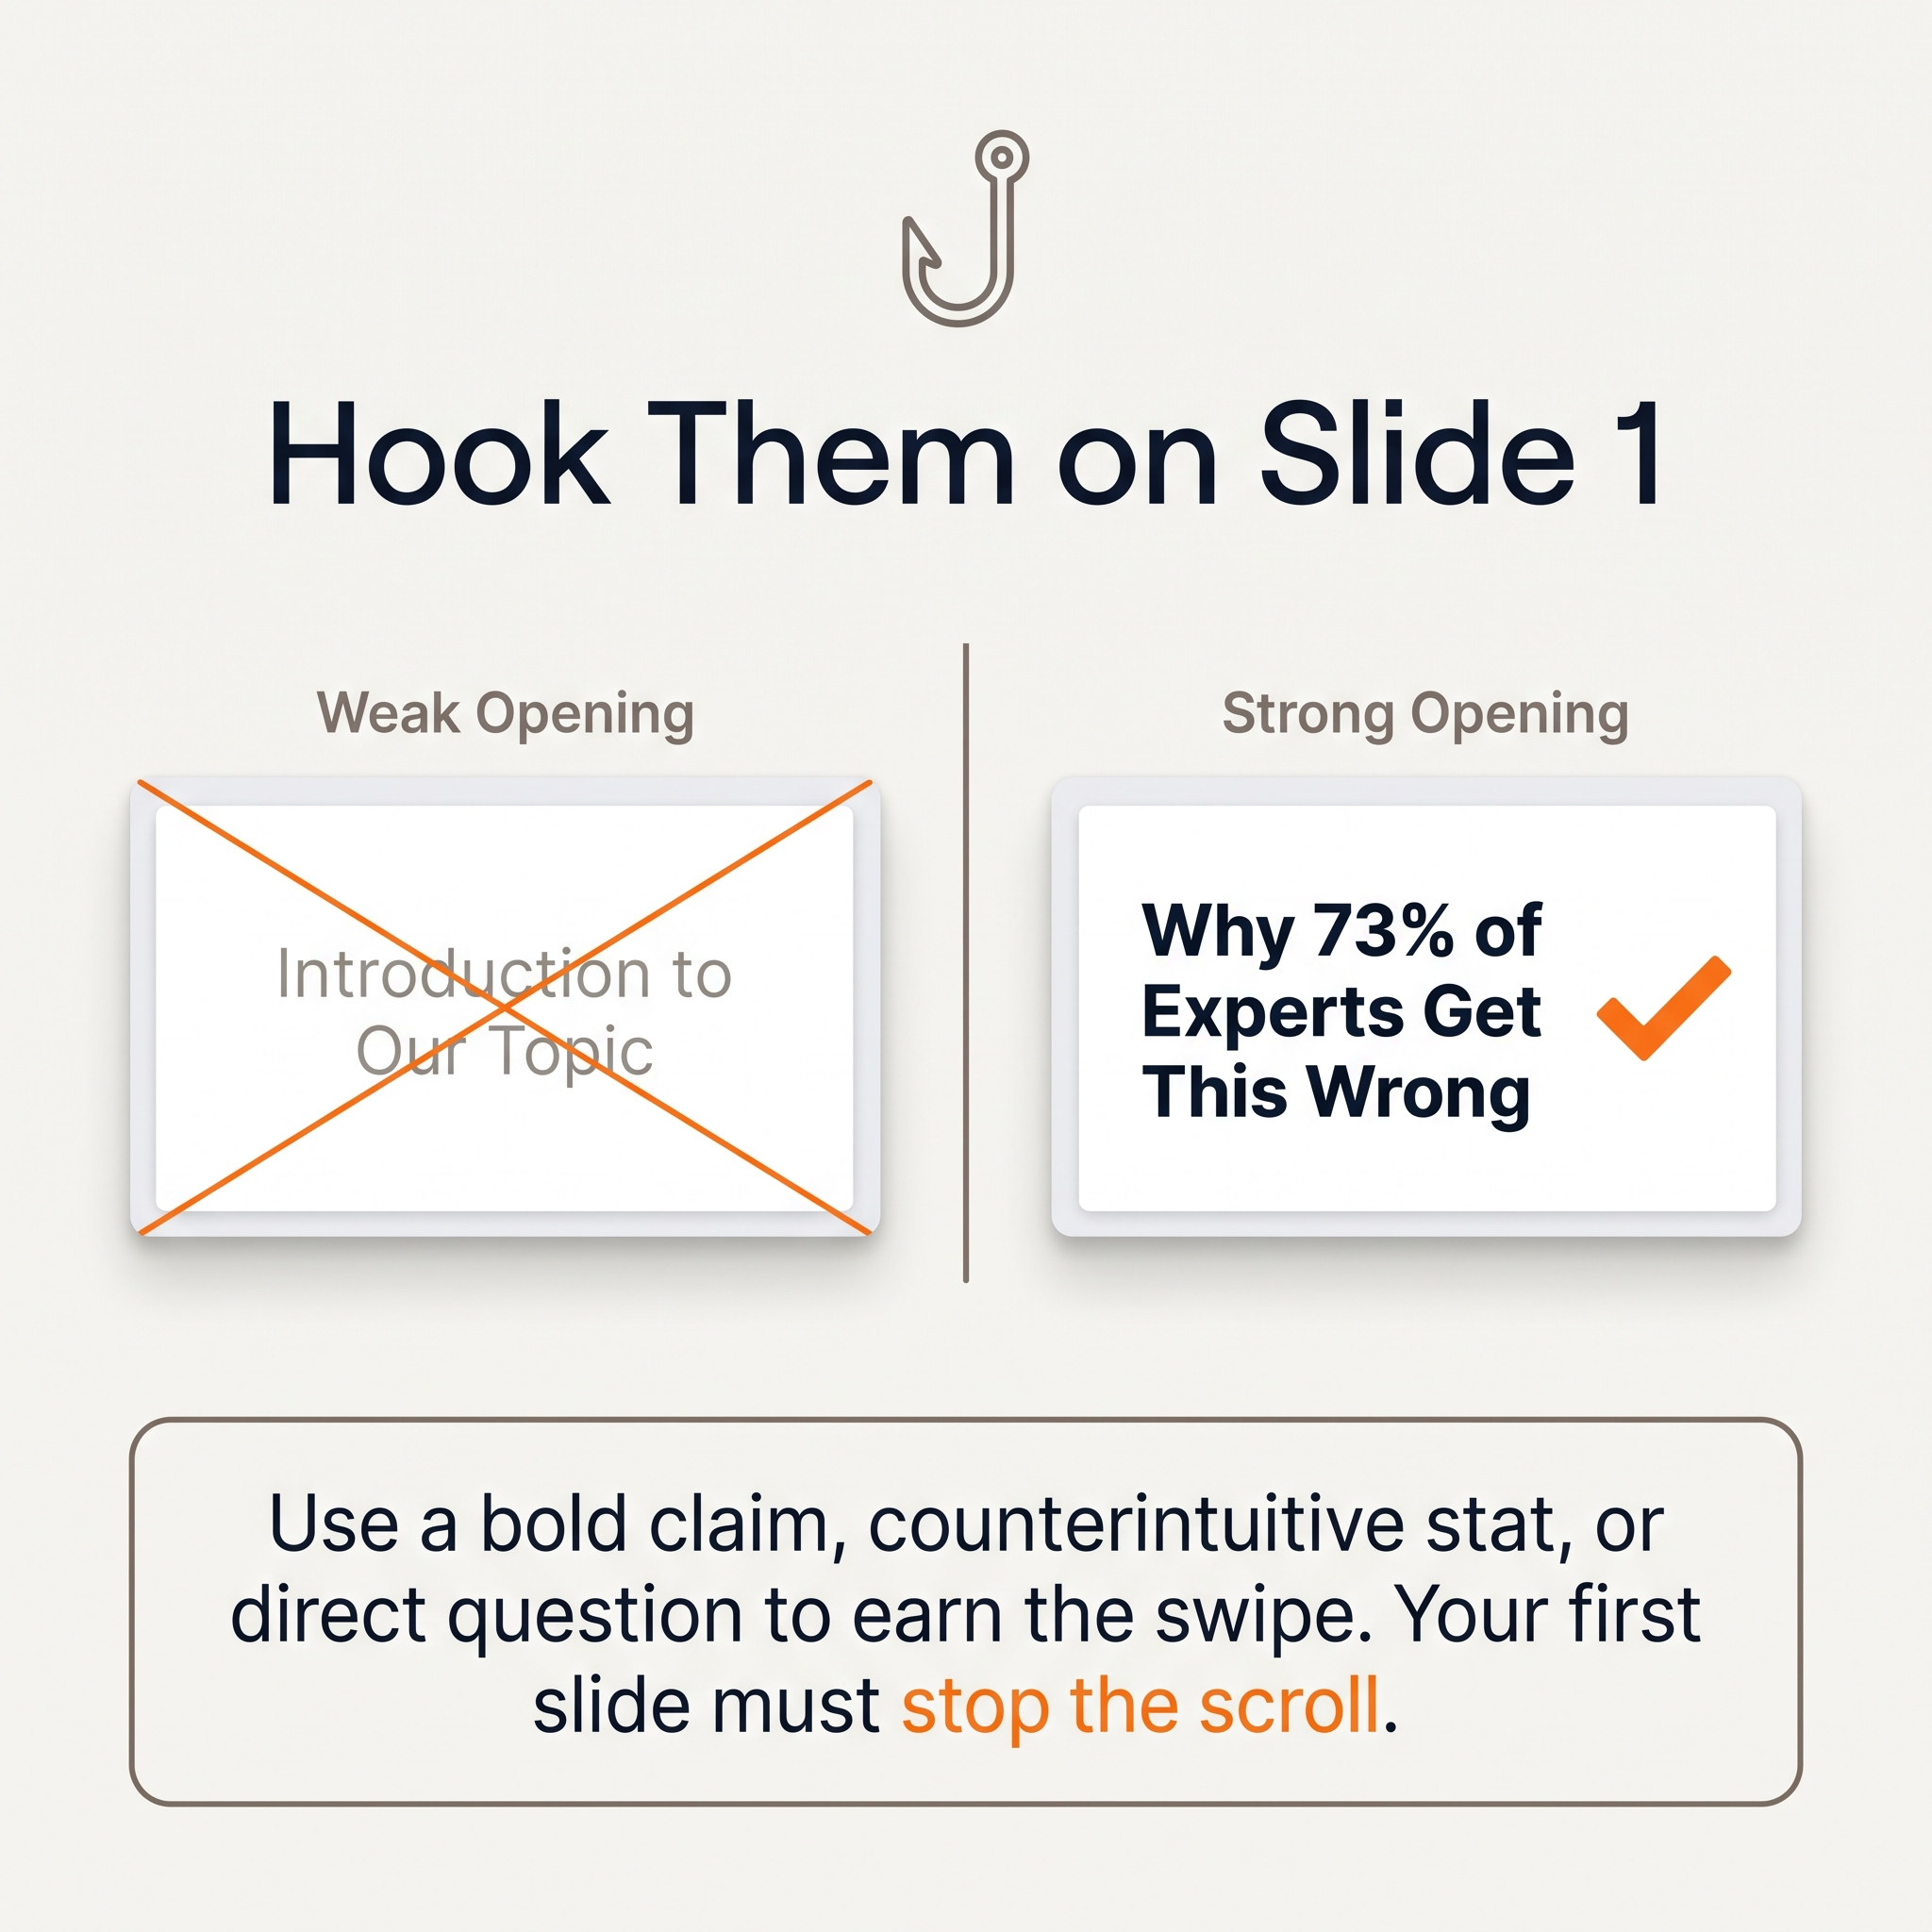 Your first slide determines whether viewers swipe to the rest.
The first slide is an ad for the rest of the carousel. If it doesn't earn the swipe, the other nine slides don't exist. Lead with a bold claim, a counterintuitive stat, or a direct question that creates tension. "3 things your blog post is doing wrong" works. "Content repurposing tips" does not. The goal is an open loop: tease the payoff on slide 1, then make the reader swipe to close it. Deliver the resolution on slide 8 or 9, not slide 2. That gap is what drives completion rates.
Once you have the hook, enforce one idea per slide. A single sentence or a short phrase. Not three bullet points, not a paragraph. Carousels that pack too much onto each frame train viewers to stop reading and keep scrolling. If a point needs more than two lines to land, it's either two slides or it belongs in the caption.
A visual throughline holds the whole thing together. Pick a two-color palette and a font pairing before you start, then apply them to every slide without exception. Consistency signals intentionality. Inconsistency signals a rushed post, and viewers feel it even if they can't name it.
Slide 10 is your CTA slide, and vague CTAs waste it. "Follow for more" is not a CTA. "Save this post for your next content planning session" is. Tell viewers exactly what to do: save, share, drop a comment, or visit the link in bio. Match the action to your actual goal for that post.
Finally, use the caption to add context the slides can't hold. The caption is not a transcript of the carousel. It's the director's commentary: the backstory, the nuance, the personal take that makes the post feel less like a graphic and more like a conversation.
Turning One Blog Post Into a Full Content Set (Not Just One Carousel)
 One blog post is raw material for an entire content ecosystem.
Most content marketers treat a blog post as raw material for one carousel and move on. That leaves a lot on the table. A single well-structured post contains data points, quotable sentences, step-by-step instructions, and supporting context, each of which maps cleanly to a different visual format and a different platform's content diet.
The repurposing logic is straightforward. Statistics and research findings become stat cards. Pull quotes and strong opinions become quote cards. How-to sections, numbered lists, and frameworks become carousels, where each slide carries one step or idea. Supporting context and visual summaries become Pinterest pins or LinkedIn thought-leadership posts. One 1,500-word blog post can realistically yield an Instagram carousel, two or three quote cards, a stat card, a LinkedIn carousel, and a pair of Pinterest pins, all from the same source material.
Canvora handles this in a single session. Paste the blog URL (or drop in the PDF or DOCX), and Canvora generates up to 15-20 platform-ready visuals across formats in one go, covering multiple format types simultaneously. The output isn't one carousel repeated across platforms. Each format is built for the platform it lives on: square and vertical crops for Instagram, document-style slides for LinkedIn, tall portrait ratios for Pinterest.
For agencies managing multiple clients or channels, the batch logic matters. Generate everything in one session, export as PNG or ZIP, then distribute across the week's content calendar. One source input, a week's worth of posts, no designer required.
For solo creators, the same principle applies at a smaller scale. A single blog post stops being a one-day asset and starts being a five-platform content set. That's content atomization in practice, not in theory.
Using Canvora Inside Claude or ChatGPT to Build Your Carousel
If you already live inside Claude or ChatGPT for your content work, you don't need to open a separate tab to get your carousel. Canvora connects to both AI assistants via MCP (Model Context Protocol), an OAuth-based integration that takes about two minutes to set up and works on every plan, including Free. No API key required.
To get started, add Canvora as a connector in your AI assistant's settings. The full walkthrough is at canvora.ai/help/integrations/mcp-setup. Once connected, the workflow is a single prompt away.
Paste your blog URL into the chat and type something like: "Use Canvora to create a 10-slide Instagram carousel from this post." The "Use Canvora" prefix matters, it tells the AI to route the request through the integration rather than just summarize the article in text. From there, the assistant reads the post, extracts the key points, structures them into a logical slide sequence, and triggers Canvora to generate the carousel. The finished slides come back inside the same conversation.
What makes this useful beyond the novelty is the context the AI already holds. If you've been drafting a campaign brief, refining your brand voice, or discussing a content angle in that same thread, the carousel inherits that context automatically. You're not re-explaining your audience or tone to a separate tool.
For teams that run their content planning inside AI assistants, this removes a common friction point: the moment someone says "we should turn this into a carousel" and then nothing happens because switching tools breaks the momentum. The carousel gets made in the same window where the idea was born.
Multilingual Carousels: Repurposing Blog Content for Non-English Audiences
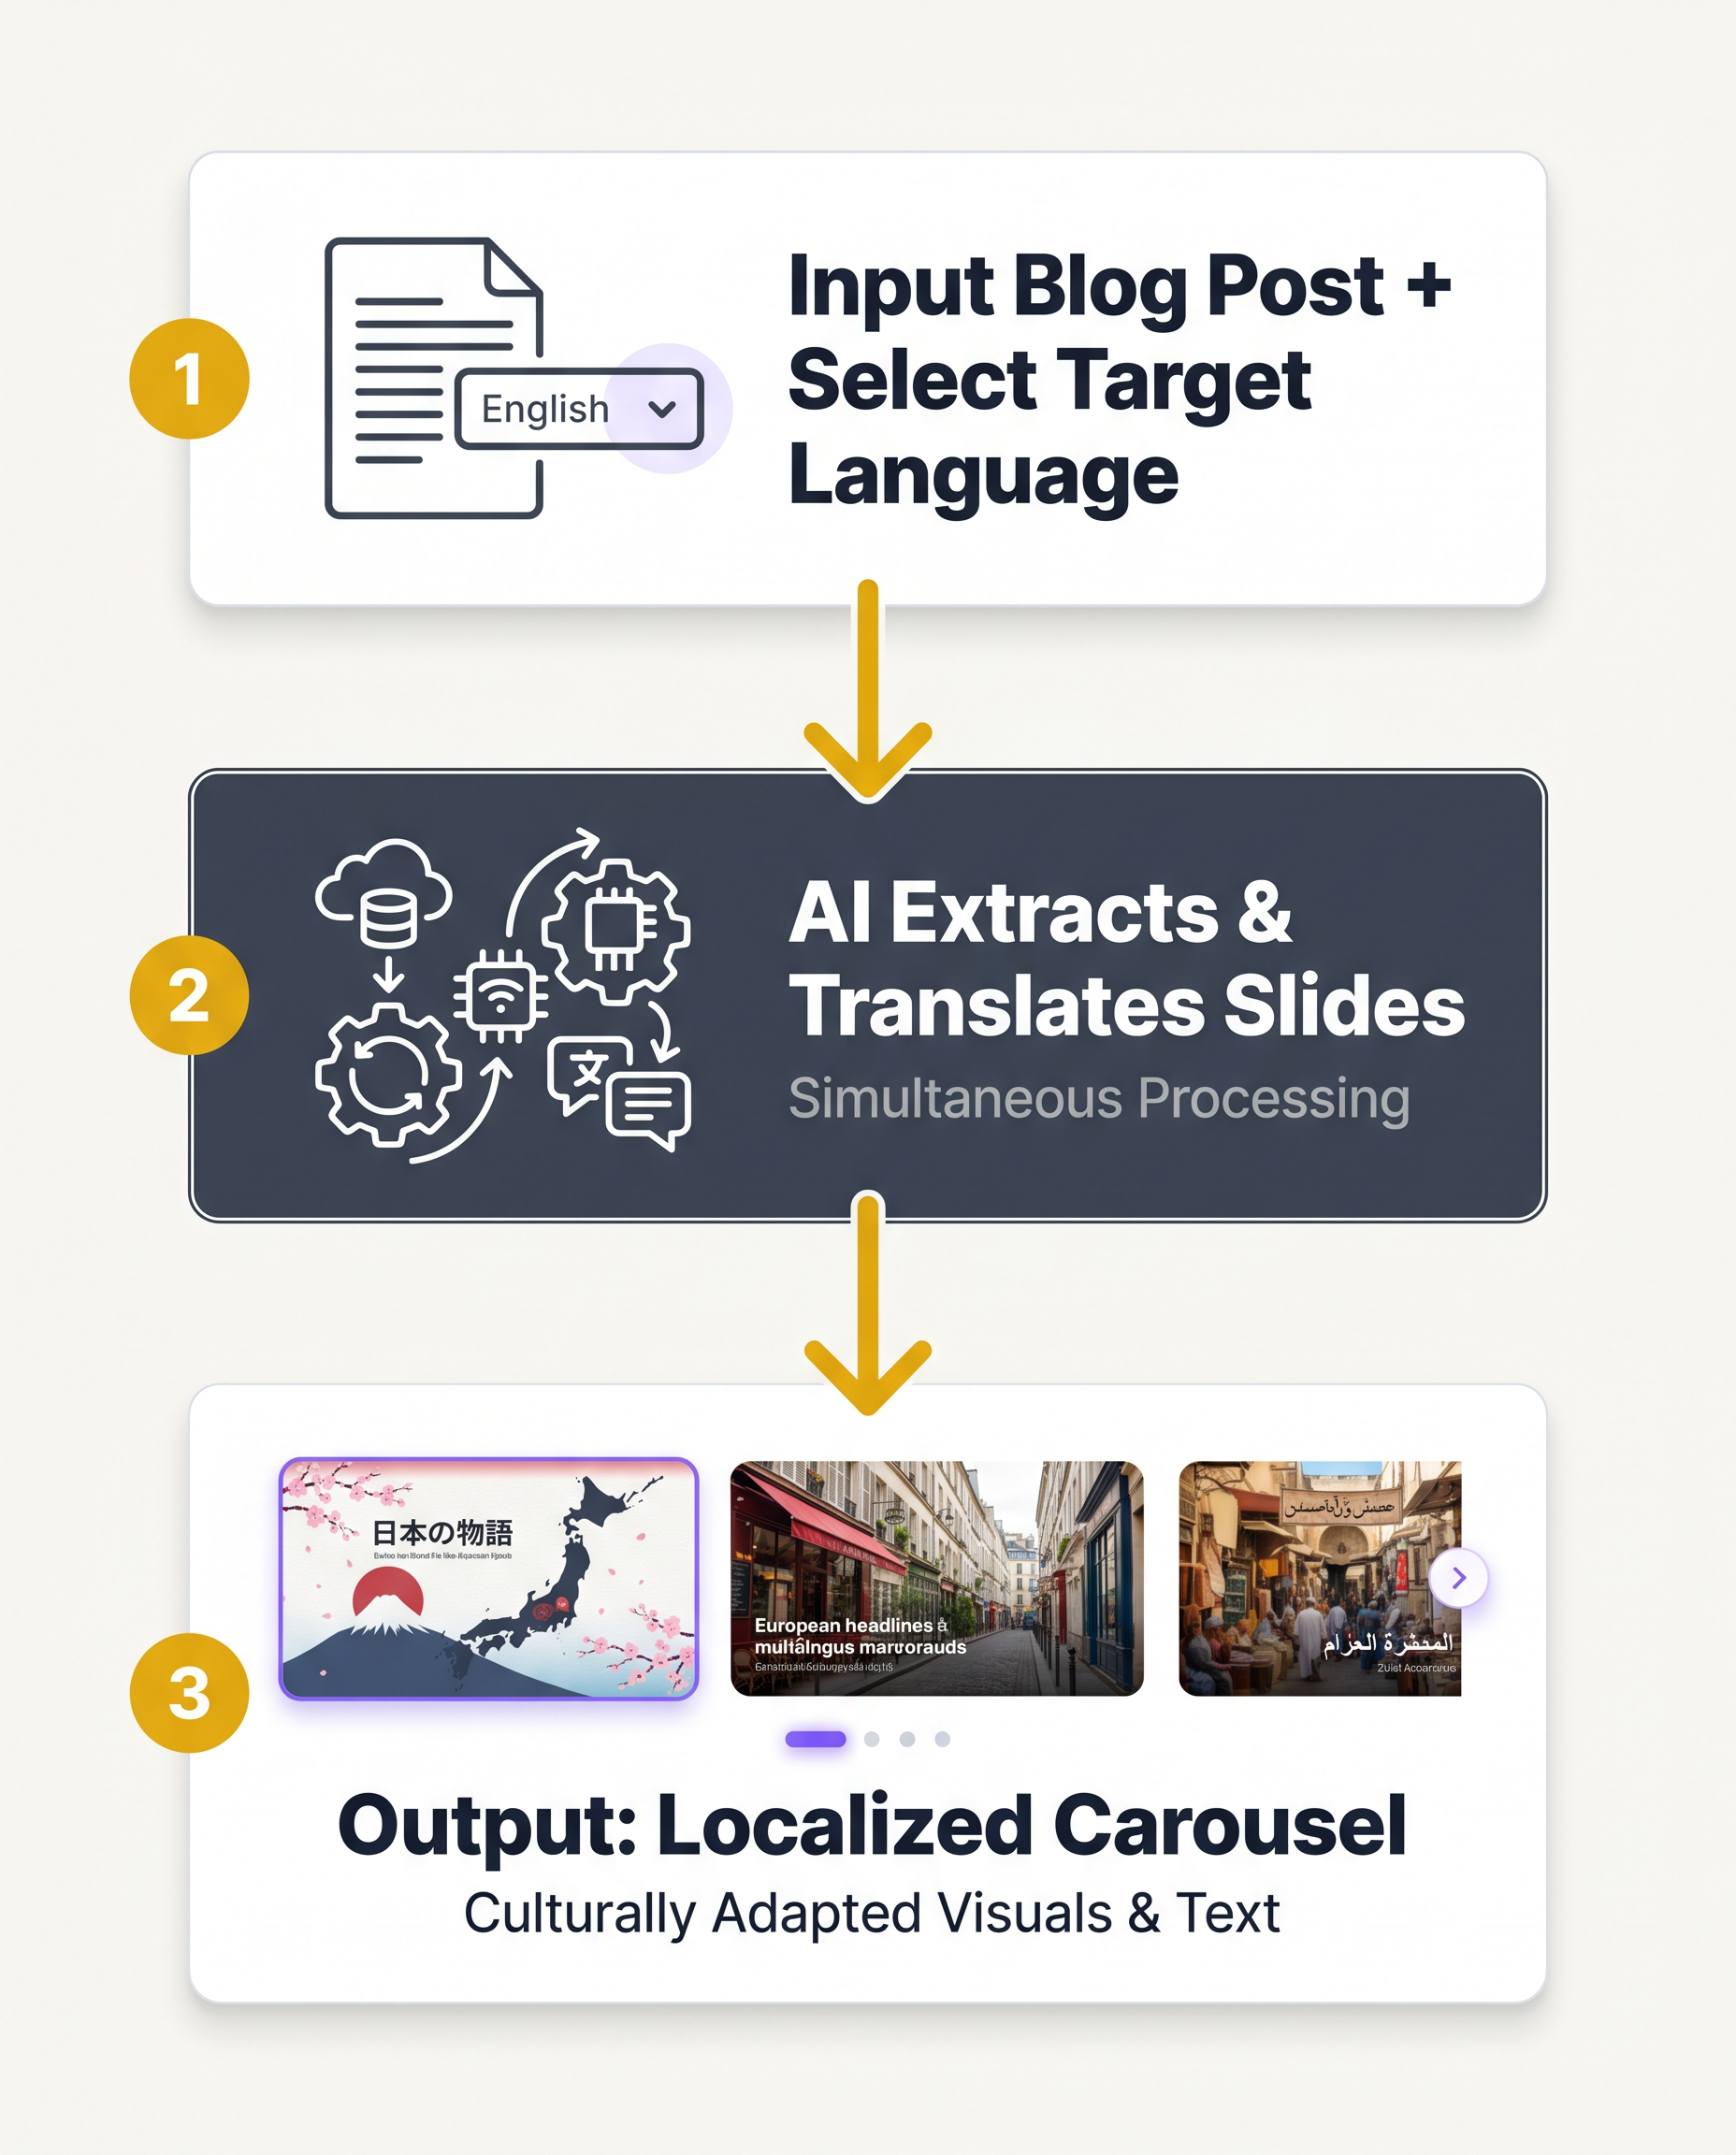 Language selection happens at input, not post-production.
Most content repurposing tools treat language as a post-production problem: generate the English visual, then figure out translation separately. Canvora treats language as an input variable. Content generation on visuals is supported in 150+ languages, which means the copy on each slide, including headlines, body text, and calls to action, is generated directly in the target language rather than machine-translated after the fact.
The practical difference is significant. A Spanish-language blog post can produce an Instagram carousel in Spanish without any manual translation step. An English post can generate parallel carousels in French, Portuguese, and Hindi in separate runs, each with copy that reads naturally in that language rather than like a literal conversion from English syntax.
This matters because Instagram's fastest-growing user bases are in LATAM, India, and SEA. Brands and creators publishing only in English are leaving a measurable share of potential reach untouched. A content team running regional campaigns across three languages no longer needs three separate design workflows or a freelance translator on standby.
Canvora also handles right-to-left scripts and non-Latin character sets in generated visual text, which removes a common friction point for teams producing content in Arabic, Hindi, or Thai.
A practical sequencing tip: generate the English carousel first. Review the slide structure, the hook, and the information hierarchy. Once the format is confirmed, re-run the generation with the target language specified. This way, structural edits happen once rather than being repeated across every language variant. For teams managing regional social calendars across EMEA, LATAM, and SEA simultaneously, that single-review-then-replicate workflow compresses what used to be a multi-day localization task into a repeatable, predictable process.
Common Instagram Carousel Mistakes (and How to Avoid Them)
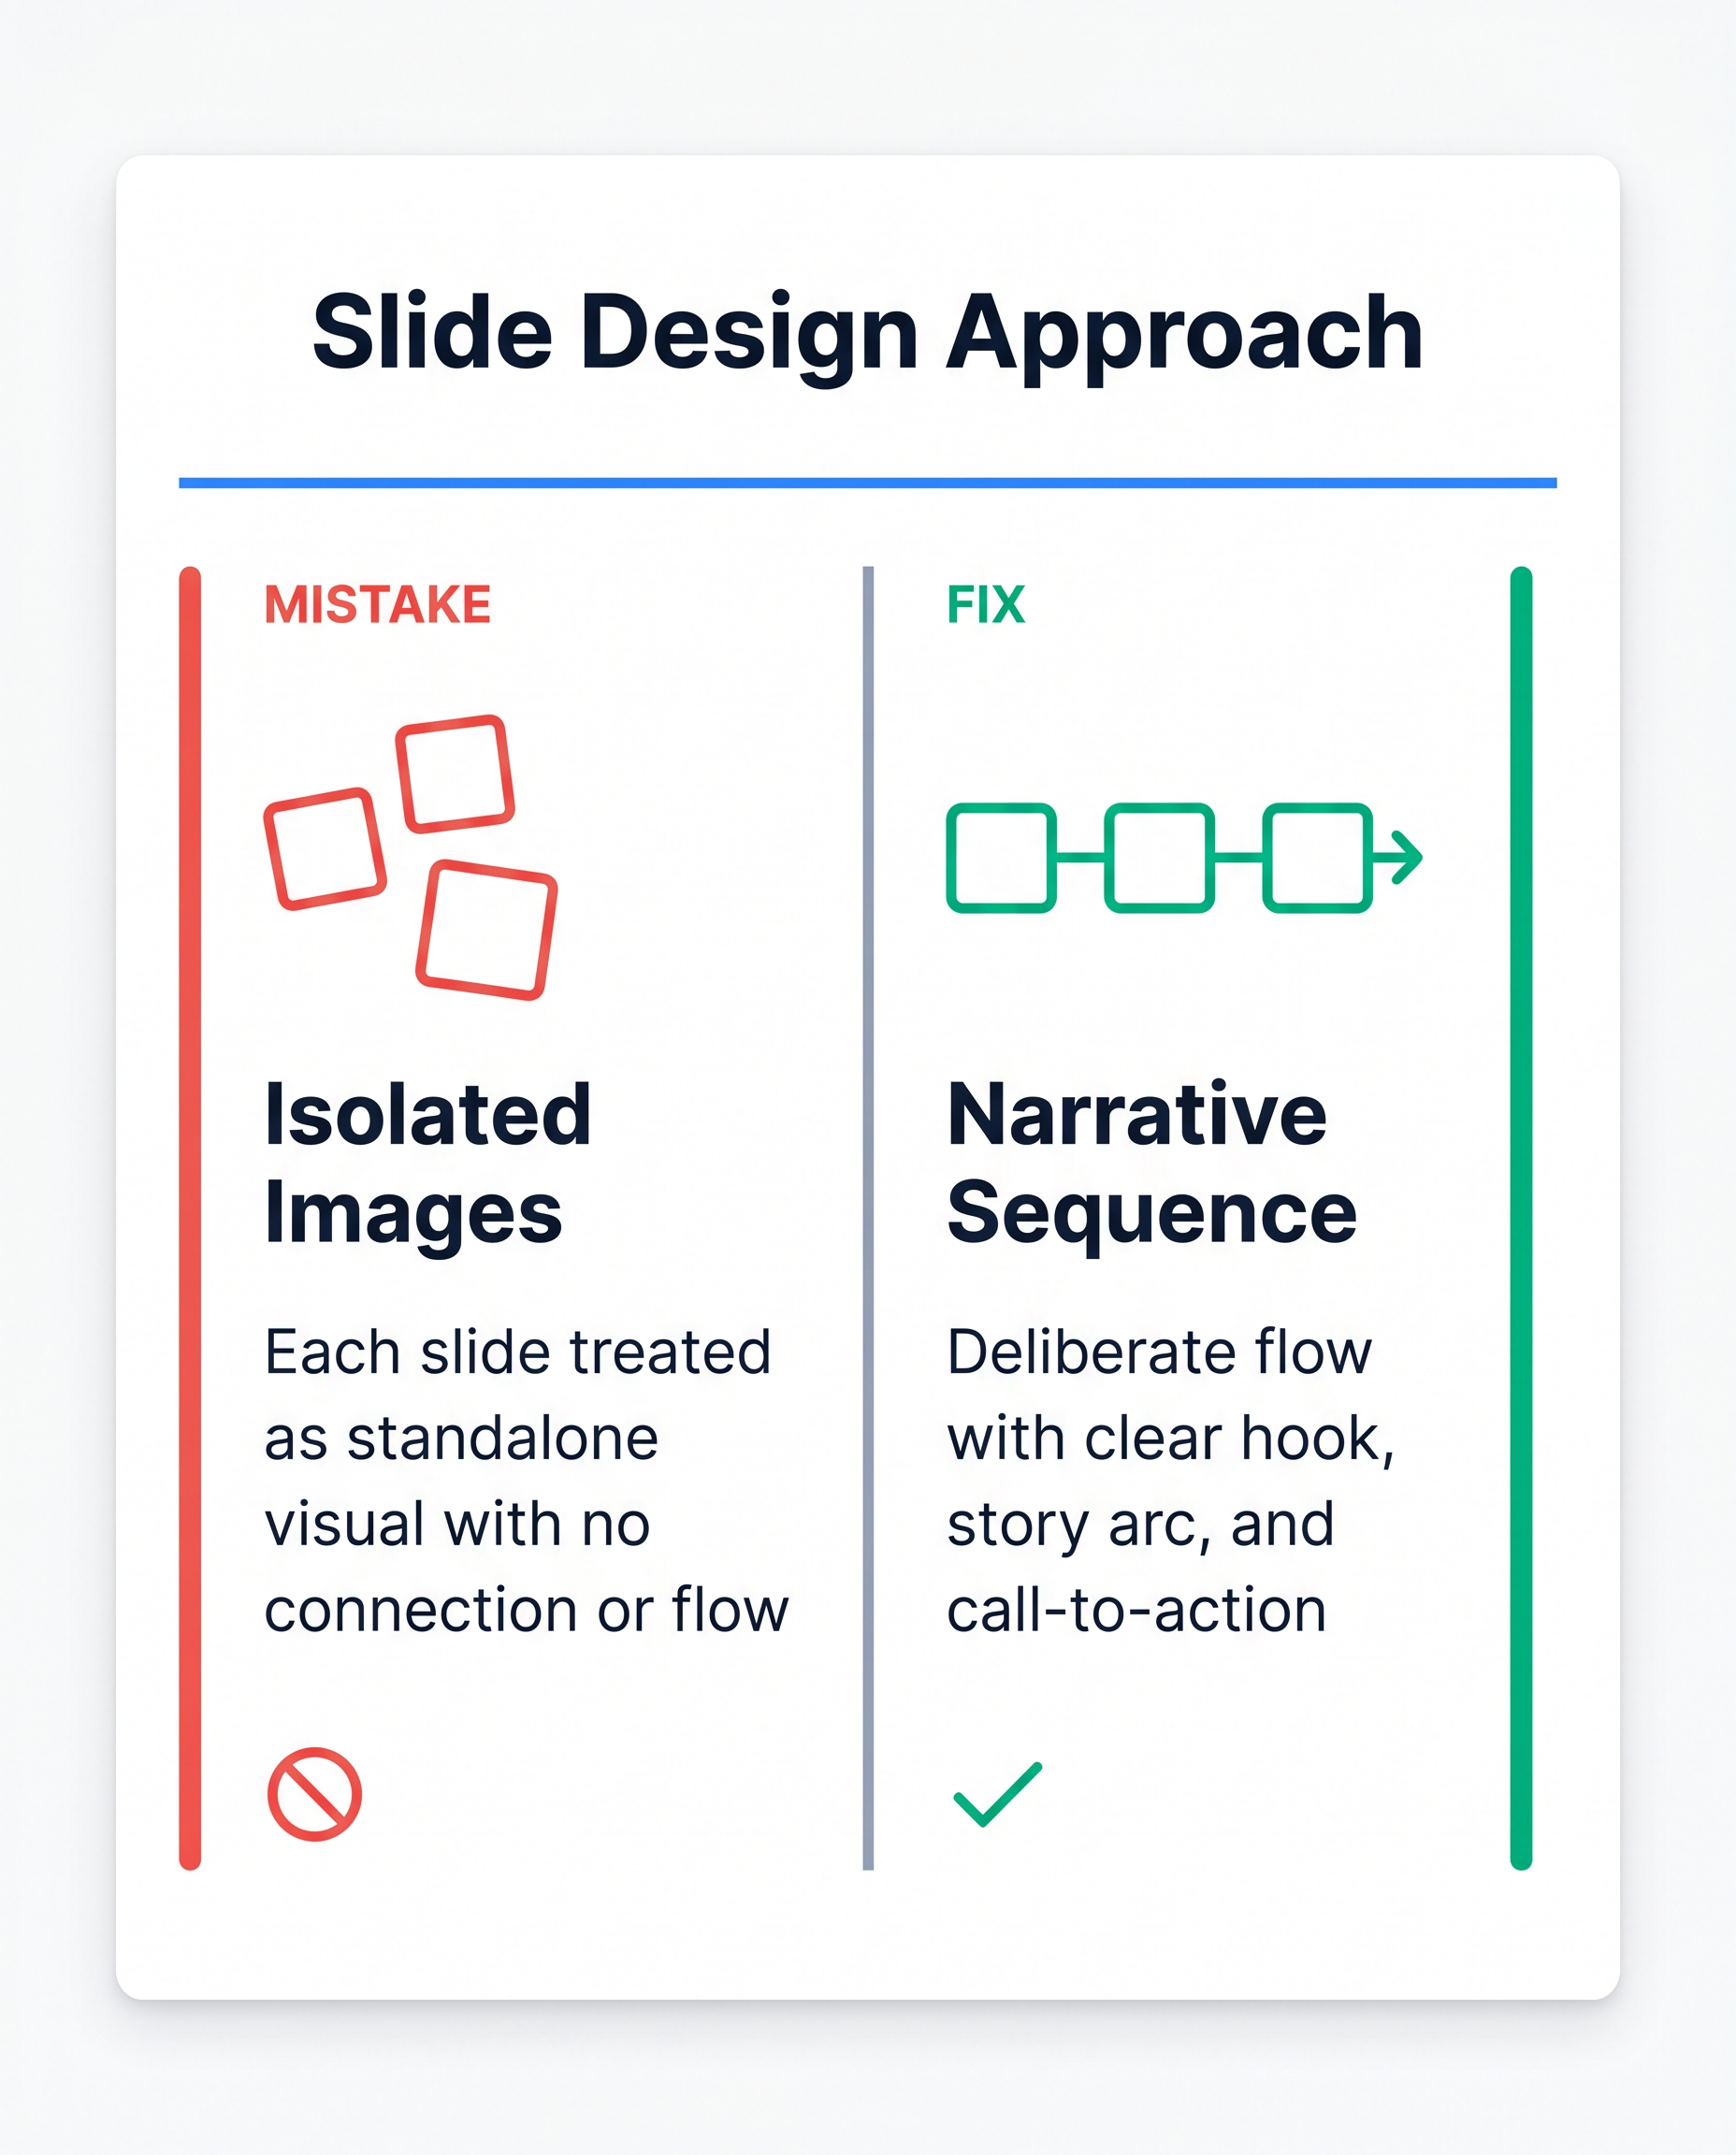 Think sequence, not isolated images.
The most common Instagram carousel mistakes share a single root cause: treating each slide as an isolated image rather than one frame in a deliberate sequence. Slide 1 is the hook. If it looks like a middle slide, with no bold claim, no tension, no reason to keep swiping, the post dies in the feed before anyone sees slide 2. Beyond the hook, the most damaging errors are packing too much text onto each slide (viewers swipe away mid-sentence rather than read a wall of copy), letting the visual style drift between slides (mismatched fonts or color shifts signal an unfinished product), and skipping a CTA on the final slide entirely. That last omission is the quietest conversion killer in content marketing. A simple "Save this" or "Follow for more" on slide 10 costs nothing and consistently lifts saves and follows. Two technical mistakes round out the list: designing at low resolution and uploading slides in the wrong order.
Mistake 1: No hook on slide 1. Lead with a specific claim, a surprising stat, or a direct question. "5 things your blog post isn't telling you" beats a decorative title card every time.
Mistake 2: Too much text per slide. Aim for one idea per slide, roughly 15-25 words of body copy. If you're editing down from a blog paragraph, cut until it hurts, then cut again.
Mistake 3: Inconsistent visual style. Fonts, colors, and spacing should be locked across all slides. Canvora applies your brand kit automatically to every slide in the set, so drift is a non-issue by default.
Mistake 4: No CTA on the final slide. Always close with a clear next action.
Mistake 5: Wrong resolution. Instagram renders at up to 1080 x 1350 px. Designing at 72 dpi or below produces visibly blurry slides on any modern Retina screen. Export at 2K or 4K where possible.
Mistake 6: Wrong slide order on upload. Instagram doesn't reorder after upload. Preview the full sequence in the app before publishing.
Canvora vs. Template-Based Design Tools for Carousel Creation
 AI-first tools reduce design time and manual effort significantly.
Template-based design tools like Canva, Adobe Express, and Visme follow the same fundamental workflow: open a template, swap in your content, adjust colors and fonts, repeat for every slide. For a 10-slide carousel, that process typically runs 20 to 40 minutes, even for someone who knows the tool well. The output can look polished, and the manual control is real. But the time cost is also real, and it compounds every time you publish.
Canvora takes a different starting point. Paste a blog URL (or the post text itself), pick a visual style, and the platform generates a complete carousel for you to review and refine. There is no template browsing, no slide-by-slide assembly. If the headline font feels too heavy or the color palette is off, you adjust it through a natural language edit or directly in the Visual Editor. The carousel is a starting point that is already 80 to 90 percent done, not a blank grid waiting for your content.
Where template tools still have the edge: pixel-perfect manual layout control, large stock asset libraries, and real-time collaboration. If you are building a one-off hero creative for a campaign launch and want to control every element precisely, a manual canvas tool is the right choice.
Where Canvora wins: recurring content repurposing at volume. Brand kits apply automatically, so every carousel stays on-brand without a checklist. Output covers 150+ languages, which matters for teams publishing across EMEA, LATAM, or SEA. And a single input can generate not just the Instagram carousel but a parallel LinkedIn carousel, quote cards, and Pinterest pins in the same session.
The cost comparison is straightforward. Designer time plus a monthly design tool subscription versus AI generation credits at $19 to $99 per month depending on volume. For teams publishing multiple carousels per week, the math shifts quickly.
Frequently Asked Questions
Q: How do I turn a blog post into an Instagram carousel?
Identify the core argument or 3–5 key takeaways from your blog post, then map each point to a single slide. Slide 1 should hook the viewer; the final slide should include a CTA. You can do this manually in any image editor at 1080×1080px, or use an AI tool like Canvora: paste the blog URL, choose Instagram carousel, and get a complete 10-slide carousel to review and export, without building each slide from scratch.
Q: Can you make an Instagram post a carousel after posting?
No. Once a post is published on Instagram, you cannot convert a single-image post into a carousel, nor add or remove slides from an existing carousel. You would need to delete the original post and re-upload it as a carousel. This is an Instagram platform limitation, not a tool restriction. It is worth getting the format right before you publish.
Q: What are common carousel mistakes to avoid?
The most common mistakes: a weak slide 1 that gives no reason to swipe, too much text crammed onto a single slide, inconsistent visual style across slides, no CTA on the final slide, designing at low resolution (causing blurry output), and uploading slides in the wrong order. Fixing slide 1 and the final CTA slide alone tends to have the biggest impact on saves and shares.
Q: How many slides should an Instagram carousel have?
Instagram allows between 2 and 20 slides per carousel post. For blog repurposing, 5–8 slides is a practical range: enough to develop an idea without losing the viewer. Slide 1 is your hook, the middle slides cover one idea each, and the final slide carries your CTA. There is no algorithm penalty for using fewer slides. Hook strength and content quality matter more than hitting the maximum.
Q: Can I make an Instagram carousel for free?
Yes, with caveats. Canvora's free plan includes a one-time 150-credit signup bonus, enough to test the carousel workflow, but outputs are watermarked and resolution is capped at 2K, making them unsuitable for production publishing. Template-based tools like Canva also offer free tiers with manual customization. For watermark-free, brand-consistent carousels at volume, a paid plan is the practical choice.
Q: What size should Instagram carousel slides be?
The recommended dimensions are 1080×1080px for square (1:1) or 1080×1350px for portrait (4:5). Portrait slides take up more screen real estate in the feed, which can improve visibility. Keep text and logos at least 150px from the edges to avoid cropping on different devices. Export each slide as JPEG or PNG, with a maximum file size of 30MB per slide.
Q: How long does it take to create an Instagram carousel from a blog post?
Manually, expect 20–45 minutes to strip a blog post to key points, design each slide, and export. With Canvora, you paste the blog URL, choose your format and style, and get a complete 10-slide carousel to review in about a minute. Editing and exporting add a few more minutes. The time difference is most significant when you are producing carousels regularly rather than as a one-off.
Q: Can I create Instagram carousels in languages other than English?
Yes. Canvora supports content generation in 150+ languages, meaning the text on your carousel slides can be generated in Spanish, French, Hindi, Portuguese, Arabic, and many others from the start, not translated after the fact. This is useful for brands targeting audiences in LATAM, EMEA, India, or Southeast Asia where English-first tools leave reach on the table.
Q: Do I need design skills to make an Instagram carousel from a blog post?
No design skills are required if you use an AI generation tool. Canvora accepts a blog URL as input and handles layout, typography, and visual style automatically. You can choose from 8 visual styles (modern, minimal, bold, elegant, playful, corporate, creative, dark) and apply a brand kit so outputs match your identity. Manual editing is available for fine-tuning, but the baseline output requires no design decisions beyond choosing a style.
Q: Can I use Canvora inside ChatGPT or Claude to create a carousel?
Yes. Canvora integrates with Claude and ChatGPT via MCP (Model Context Protocol). The connection is OAuth-based and works on all Canvora plans, including Free, with no API key required. Setup takes about 2 minutes. Once connected, paste a blog URL into your AI assistant, prompt "Use Canvora to create a 10-slide Instagram carousel from this post," and the carousel is generated without leaving the chat. Full setup steps are at canvora.ai/help/integrations/mcp-setup.
Tools mentioned in this article:
For your team / role:
Turn your content into a carousel now
Paste a URL, PDF, or idea — Canvora generates a ready-to-post carousel, on brand and in 150+ languages.
Free to start · 150 credits, no card · 150+ languages
More from the blog
How to Make an Instagram Carousel Without Canva
Skip the template drag-and-drop. Learn how to make an Instagram carousel without Canva using AI tools like Canvora, and get results faster. Try it free.
How to Turn a Blog Post Into an Instagram Post
Learn how to turn a blog post into an Instagram post, from picking the right format to generating visuals fast. Start repurposing your content today.